Uploading documents
The best process for uploading binary files is to upload and publish them before you edit the page using them.
Keep documents organized by grouping them into like topic folders. For example, if the PDF is about a process for undergraduate students, upload the PDF into the undergraduate folder, or section, of the site. You should create a docs or documents sub-folder to keep them together.
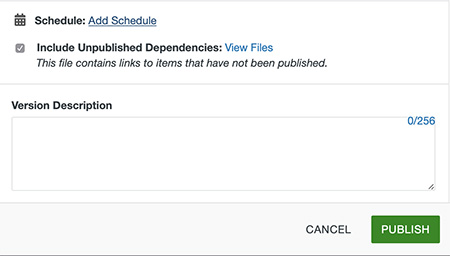
Note: Binary files uploaded to system must be published to be available when previewing a link.
There are two ways to upload a file:
- Upload them from the Pages list view.
- Upload from the Insert/Edit Image dialog window.
Uploading from the Pages List View
1) Under Content, click Pages.
2) Navigate to or create the folder to which the file(s) should be uploaded.
3) Click the Upload button in the top right of the screen. (Alternatively, drag files from the desktop into the browser window.)
4) The Upload dialog box will open. 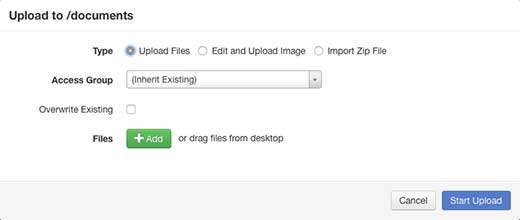
- Type defaults to the most common 'Upload Files'. If uploading a large batch of files, use Import Zip File. The feature will extract the contents of the ZIP file and upload each individual file into the system.
- Avoid changing Access Group. This should default to the folders access settings. If there is a permissions issue, please contact webservices@k-state.edu.
- Check the Overwrite Existing box if you are replacing a previously uploaded file with a new file. The filename and extension must match exactly.
5) Click the blue Add button, select the file(s) you wish to upload and click OK, or drag and drop the files you wish to add into the window.
6) If necessary, rename or remove the file(s) by clicking More Actions (the three dots) to the right of the file.
- To change filename, click Rename and type new, web-friendly filename with extension and then hit enter.
- Filenames should be descriptive, but concise using full words and numbers. To keep things simple avoid capital letters and spaces. Use a hyphen (-) or underscore (_) between words. Other characters are not allowed and will cause an error.
7) Click Start Upload.
8) Publish the file to make them visible on the live server and in Page Preview.
Uploading from a File chooser
1) From the Edit view of a page, enter an editable region by clicking the green Edit button.
2) Click the Insert/Edit Link icon in the editor's toolbar.
3) Click the URL icon to the right to bring up the file chooser.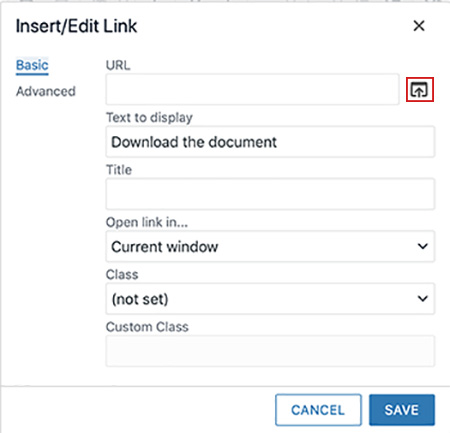
4) Navigate to the desired folder and click the blue Upload button in the top-right of the dialog box.
5) The Upload dialog box will appear. Follow steps 5-8 above to upload the files.
6) The files are now uploaded into the directory and can be placed on the page.
7) Save changes.
8) Because the files you uploaded have not been published, they are not viewable in the page preview.
- The system will publish any associated files automatically if the Include Unpublished Dependencies checkbox is selected when the page is published.