HOW TO: Automatically import a Zoom Cloud recording
When scheduling a meeting in Zoom, you can direct the Zoom Cloud recording be automatically imported into Mediasite.
Video: How to automatically import Zoom Cloud recordings (6:39)
First-time setup
Check your Mediasite profile settings
Before you start using the integration, make sure your Mediasite user profile's email address is formatted as eid@k-state.edu.
-
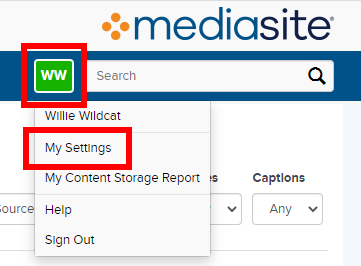
From within your My Mediasite portal, navigate to My Settings .
-
Verify the Email Address is formatted as eid@k-state.edu. If it is not, change the Email Address and optionally the Moderator Email Address, then select Save.
-
If you changed the email address, Mediasite will send you an email to re-validate your Mediasite profile. Check your email account and click on the validation link in the email to re-validate your Mediasite profile.
Enable automatic transcription in Zoom
Zoom can improve the accessibility of your cloud recording by automatically transcribing it. Once available, Mediasite will import the transcription as closed captions, which can be edited for accuracy.
-
From the Settings page on the Zoom website, select the Recording navigation tab at the top.
-
Under Advanced cloud recording settings, check the box to adjacent to Create audio transcript to enable automatic transcription of your cloud recordings.
Configuring a Zoom meeting schedule to automatically import cloud recordings into Mediasite
-
Use the ksu.zoom.us website or the Zoom client application to schedule a new meeting or edit an existing meeting schedule.
-
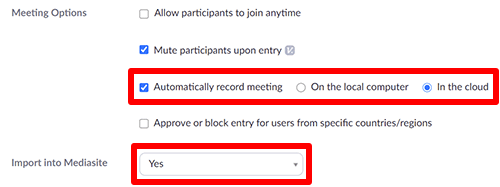
Within the schedule configuration under Meeting Options, select Automatically record meeting and then choose In the cloud. Alternatively, you can manually start the cloud recording during the meeting, which can reduce the number of "false start" recordings but requires you to remember to start the recording.
-
Under Import into Mediasite, selet Yes.
Note: These form fields may appear under Advanced Options in the Zoom client.
-
Select Save to save your Zoom meeting schedule.
After your recorded Zoom meeting has ended, Zoom will process the cloud recording and it will be automatically imported into Mediasite. Once the recording has been imported into your My Mediasite Drafts folder, you can move it to the appropriate channel or shared folder.
Important things to know
-
The integration with Zoom Cloud will not work unless your Mediasite profile's email address is formatted as eid@k-state.edu. See the instructions above for details.
-
The integration only imports recordings from the Zoom Cloud. It will not import Zoom meetings recorded locally to your computer.
-
Imported recordings will be placed in your My Mediasite Drafts folder. Once the import is complete, you can move a recording to a channel or shared folder, if desired.
-
Recordings are not imported immediately. Zoom Cloud will require time to process the recording. Processing and importing the recording may take several hours, largely depending on the length of the recording and the availability of system resources in the Zoom Cloud.
-
If you have enabled transcription of your cloud recording in Zoom, Mediasite will import the transcript as closed captions once Zoom completes the transcription process. Remember, automatically transcribed captions should be edited for accuracy.
-
In the event a Zoom Cloud recording fails to import into Mediasite, the best course of action is to manually download the .mp4 recording from the Zoom Cloud and then upload it to Mediasite.
-
Recordings imported into Mediasite are not removed from the Zoom Cloud. It is a best practice to regularly review your Zoom Cloud storage as well as your Mediasite storage and remove recordings you no longer need.