FAQs
With the multitude of design software available today, many people create their own newsletters and brochures before they take them to a printer. Unfortunately, because of this software variety, many disks brought to University Printing contain files that our composition department cannot easily access. To minimize these problems, we suggest you consult with us BEFORE you begin any work. If your file is a Macintosh file, there will be few problems. If it's an IBM compatible PC file created in any "standard packaged" software product, however, there could be several problems. Here are some common questions asked of University Printing.
Do I have to go to University Printing for my printing needs?
What type of work can I get done at University Printing?
What type of file formats do you accept?
Why do I need to include my fonts? Aren’t they in the file?
My graphics are embedded, so why do I need to include them separately?
Why do my graphics look so blocky?
What are color separations? Printing spot color vs process color.
How much will my job cost? Cost control tips.
7 things to avoid when building your files.
Use of university logos and seal.
How do I fill out the order forms?
Does a list or an address have to be updated every 95 days?
Can I hand apply my labels and bring the project over to University Printing to bulk mail for me?
Do I have to go to University Printing for my printing needs? (Top)
University and state policy requires that all printing work paid from state administered funds be referred to University Printing or another state contracted vendor. It is not necessary to go through procurement or state purchasing when ordering directly from University Printing, which usually saves time and money.
What type of work can I get done at University Printing? (Top)
Our services include everything from quick copy services to full-color printing combined with a variety of finishing and mailing capabilities. This includes business cards, letterhead, envelopes, graphic design, brochures, posters, portfolios, books and more. Our experienced composition staff and prepress units, together with a mix of presses and combined with an incredible bindery department ensure your job will be completed expertly from start to finish.
What type of file formats do you accept? (Top)
K-State University Printing supports the following -
"Printers Choice" programs and software we suport:
Macintosh OSX files
Adobe In-Design
Adobe Illustrator
Adobe Photoshop
Adobe Acrobat
Non-Standard software programs we support:
Microsoft Publisher
Microsoft Word
Microsoft Power Point
We can work with .pdf, .eps, .tif, .jpg, .wpd, .qxd, and .doc files.
To get the best print quality for your projects, it is best to use a high quality page layout program. University Printing uses two primary layout programs, Quark Xpress and Adobe In-Design. Both are excellent pieces of software that allow for single page documents all the way to multiple paged complicated books. Although we are able to work with Microsoft Office software, we do not recommend its use for high quality offset (printing press) printing. Publisher and Word work best when the piece is to be printed on a digital printer, or if you are planning on having us do the actual layout for you. We understand that some of our clients do not have access to our preferred layout programs. University Printing has established ways of working with other files when needed to make them press ready, so please call if you have a concern about your file format. When submitting text for our designers to use in creating a layout for your project, do not format it.
- Avoid centering and justification as these will be set in the page layout
program. Just indicate if they need to be centered or justified. - Never put a hard return where it seems a sentence should break.
- Always let text automatically flow from line to line. Generally, use two hard
returns between paragraphs. You only need to type one space after periods. Most typefaces on computers today use variable fonts, in which each letter and mark take up just the space they need in contrast to the equal spacing of letters on a typewriter, so two spaces are unnecessary and create too large a gap.
What is the problem with using Microsoft software to build my design? (Top)
You are always more then welcome to design and layout what you would like your project to look like and bring it to us for assistance in making it press ready. While MS software such as Word, is great for word processing, it was not created for use as a layout program. We understand that many of our clients have MS software and we do try to accommodate them. However, when it comes time to bring your files to University Printing, programs such as Word, Excel, and PowerPoint often have problems re-wrapping text and substituting fonts. In turn this will add composition time and thus more money. So what can be done? We can still take your word files and use it to create the publication you desire. Here's how you can help to keep your cost down. When you are ready to submit your project remember to include:
- Fonts—remember to include them along with your file.
- Graphics— include any photos, clipart, or graphics you placed into your file
along with your file. - A printed copy of your file—this is very important. If we open your file and text reflows we need to know what it is you are expecting to see when you get your proof. We can only guess at what it is supposed to look like if we do not have a hard copy to look at—even if it is only in black and white.
The Problem with Publisher
Microsoft Publisher is a great desktop publishing software program that many offices on campus use to create forms, cards, flyers, posters and sometimes newsletters. The program has a variety of templates available to get you started and done quickly. These qualities are great for small in house digitally printed jobs. But when you are printing these types of jobs in larger quantities and on an offset press, things start to get a little more complicated. Here we will try to explain the challenges faced by University Printing when we get a Publisher file from our clients. Items in italic are ways to help lessen the problems faced.
- Publisher is only a PC program. KSPS composition department is primarily MAC based.
- Most files are built in RGB (standard for PC’s) and our presses print in CMYK. Pick colors in CMYK mode or a Pantone color for your spot colors.
- Many fonts do not transfer to the MAC environment. Be sure to include fonts on your disk so we can work around missing font issues or use fonts that are “standard” or “common” to both platforms such as Helvetica, Garamond, or Palatino.
- Images embed into the document. ALWAYS include original image files so you are assured high quality reproduction.This means all photos AND clipart that you place in the document. University Printing has found ways to circumvent the crossplatform issues that we have encountered, nonetheless the finished product may not look exactly the same as your sample but will look very close. When we have to adjust a publisher file it could add an extra 2-3 days to your project, but University Printing will gladly work with you to print your projects that you bring to us.
We are willing to help you understand the printing process by giving you tours of our facilities and letting you know what programs will help your projects flow through the system faster and with fewer problems. You are always able to call and ask questions about what we need from you, or you need from us.
Why do I need to include my fonts? Aren’t they in the file? (Top)
Most people believe that the fonts are automatically included with their files, this unfortunately is not true. When you create a document on your computer, the software is utilizing your version of fonts. There can be several different versions of each font which can cause your lines of text to re-reflow*. Even Times (common as it is) has several different versions on the market, which makes it important for us to have the version that was used in the creation of your document.
* Text Reflow—Many software packages format your job to the default printer on your system. When it is opened on a different computer with a different default printer, it can cause text reflow, margin changes, and text to drop off the page.
If you need help locating your fonts please feel free to call us at 532-1526.
My graphics are embedded, so why do I need to include them separately? (Top)
Another common misconception is that your graphics are embedded in your publication. Although we can see them on the screen and in the document, this does not mean that the actual .eps, .jpg or .tiff file is included on your disk. In order to ensure that your publication’s graphics print properly, always include your image files separately on the disk.
Graphics saved on your system are not loaded on our computers. When you open files on a computer that does not have your graphics, they will either not print or print a low resolution version only.
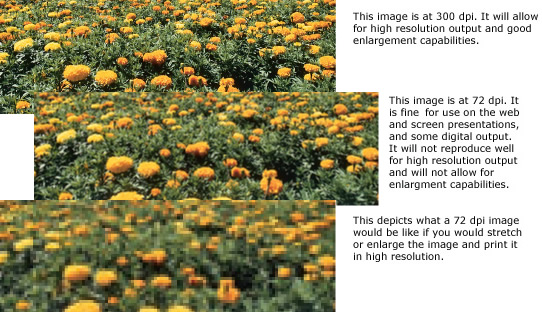
Why do my graphics look so blocky? (Top)
Often when graphics/images are pulled from web pages, or copied out of other digital publications, the resolution is set too low for printing (typically 72 dpi). The blocky appearance is known as pixelation. When considering the use of Internet graphics for your printed work, you will want to take a few things into consideration. If you want your publication to look its best, it is worth the time and effort to locate the original image or find another suitable graphic. When using graphics for print work it is always a good idea to have them scanned at 300 dpi or higher. This will prevent your graphics from becoming pixelated. Another reason for pixelated or blocky graphics is that the “link” to them has been lost in the layout software. Commonly this will happen if you do not send your graphics along with your publication. When opened on a different computer from the one in which it was created, the document only has an “idea” of what the images looked like and prints them out as such.
What are color separations? Printing spot color vs process color. (Top)
KSPS offers two general types of printing. For short-run black and white and color jobs (quantities of around 1,000 or less depending on the job) and variable data printing, we use high speed digital printing. The second type of printing is offset printing. This type of printing is done on an offset press that prints ink onto paper. Offset printing is meant for longer runs 1-, 2-, 3-spot color, and full-color jobs. Electronic document files for offset jobs must be processed through the prepress area. If these documents are designed with two or more colors, they must be created with a computer program that is capable of doing color separations. Some programs do not allow for color separations. Click here to learn more.
Separations mean that a page is created for each of the printed colors used in the document. For example, if you create a document with blue headlines and black body text, we will process a separate page for the blue headlines and another page of just the black body text. These separations are used in the printing process to make plates that load onto a press and ultimately transfer onto paper.
Four-color process printing is an amazing procedure. Few people outside of the printing industry fully realize either the complexity or the different processes required for converting a color photograph for use in a printed medium. In four-color process printing, inks are used together to create new colors. Because process inks act much in the same way as filters, subjects containing several different colors or gradations of colors can be reproduced using just three colors of ink: cyan (blue-green), magenta (bluishred), and yellow. Process yellow absorbs only blue light, magenta absorbs only green light, and cyan absorbs only red light. When yellow is printed on top of magenta, the result is a shade of red. Yellow printed on top of cyan results in a shade of green. In theory, when cyan, magenta, and yellow are printed on top of one another, black should be the result. In reality, the result is a brownish color, because of the nature of pigments. To help compensate for this, black is added as the fourth color in four-color process printing. This process is often referred to as CMYK.
Look at the photograph on the left. You can differentiate hundreds of different colors in it. However, when it is printed only four inks are used—Cyan, Magenta, Yellow, and Black (CMYK). First, a four-color separation is done from a color slide (or photograph). Occasionally, four-color separations must be ordered through an outside source, please allow additional time for this special order. These separations allow us to burn plates for each color used. These plates are the image carriers used on the press that enabled the press to transfer ink to paper. This transfer results in an image consisting of hundreds of thousands of different sized dots, just like a black-and-white halftone, except that now instead of just one black-and-white halftone, there are four colors of ink laid on top of one another. If you were to look through a magnifying glass you can see some of the dots are printed on top of one another, some are printed right next to each other, and some are just close together. The viewer’s mind is constantly blending the dots, approximating the colors found in the original image.
Printing Spot Color VS. Process Color
There are two different ways color can be applied to paper in color printing: spot color and process color. Spot color is a method of applying a premixed color of ink directly to the page. Process color applies four or more standard ink colors in very fine screens so that many thousands of colors are created. Spot color is usually used when a few exact colors are needed. Process color is more useful for printing photographs, paintings and very complex colored images. In some cases, both spot color and process color can be used on the same document. For example, a company brochure may include color photos (process colors) and a corporate logo (spot color). Spot is usually identified by a color system such as the Pantone Matching System (PMS). It is useful for documents that require only a few colors, such as newsletters, brochures and stationery. Spot color is also used to match specific colors very closely. Process color is used when documents are four or more colors. The original image is separated into its cyan, magenta, yellow, and black components. A plate is produced for each color needed. The paper is run through the four stations of a four-color press to accept layers of ink from each plate. Spot colors can be created in a process color printing by overlaying the inks to match a specified color. The cost of printing color documents is related to the number of ink colors used. As process color requires four or more inks, spot color can be cheaper if you use fewer than four colors. Spot color also has the advantage of printing a wider range of clean, bright colors.
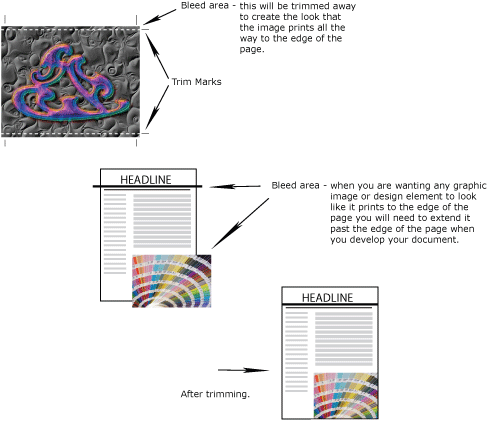
What is a bleed? (Top)
How many times have you been asked does your document bleed? A bleed is when any part of the image, text or graphic, is printed to the edge of the page. To achieve a bleed on a printed document we will print your document on a larger piece of paper, then the edges will be trimmed off of the paper right up to the image so you have the look of the image printing to the edge of the page.
It is best if you can build your document to include extra image that can be trimmed away. This is so that when multiple sheets are stacked together and trimmed there will be no white space left around the edges. For example, if you are developing an 8½ x 11 flyer that bleeds you will want to create the document size at 8¾ x 11¼.
How much will my job cost? Cost control tips. (Top)
With the recent budget cuts and restraints, cost is very important. With several different printing methods for you to choose from, it can be difficult to determine which to use. When it comes to cost there are several items that figure into your final price. Estimates can help you plan printing orders. To get the most accurate estimate for your job, be specific and provide as much information as possible. From this point we can discuss job specifications, and make suggestions that can help you cut costs but still have the quality piece you desire. Some ideas could be:
- Have your file ready and proofread when you bring it in. Thorough proofing should be taken seriously and is necessary to avoid costly re-runs.
- Allow us enough time to do the job in the most cost efficient way. Practical planning is the most important key; know ahead of time exactly what you want.
- Sometimes it is more cost effective to put it on an offset press rather than through our digital printers.
- Printing on standard size paper and not bleeding the image off the page will help with cost control.
- Are you typically reprinting certain jobs several times a year? When possible, anticipate your annual needs for these jobs. Getting a maximum press run the first time saves time and money. Produce as many copies of your job as you will need. Once the press is set up, the ink mixed, and the paper ordered, it is considerably less expensive to print multiple copies than to run just a few with the intention of printing more in the near future.
- If you know you will be using the same publication over a period of time, try to design it so that it can be reprinted without changes being made.
Alterations require more time & effort, and depending on the extent of the changes, can be as expensive as printing a new job. If you have
space for storing, you may consider ordering a years worth of the publication, as it is less expensive than reprinting. - If you are printing newsletters, bulletins and other periodic publications, consider having “preprints” made. We can print your masthead, title
bars, etc. in color, store them for you, and then imprint the black ink copy for each issue on our digital printers. This allows you to have
multiple ink colors on you publication without paying for it each time you publish a new edition and helps speed up the printing process. - Using screens in your publication can be a good way to add dimension and visual interest to you piece. This is also a good way to create the illusion
of more colors when you may only be using one or two ink colors. - Be sure of mailing list counts. Do not print over what you need so you will not have a large carryover.
- Create documents to be self mailers instead of using envelopes.
How do I upload large files? (Top)
K-State University Printing is making use of an easy to use Large File Transfer System to allow clients to send us files that are too big to send through email.. When you use this option for sending us your files we still need to have a completed order form before we can process your job. You can fax, email or send it to us through campus mail. If we do not receive one we will not know your job is waiting to be printed.
To use our Large File Transfer System:
1) Go to KSRE Online's Large File Transfer System <https://filesender.internet2.edu>
2) Pick Kansas State University from the available list.
3) Log in using your standard university login.
4) Enter "uprint@ksu.edu" in the To: field of the site.
5) If you have more files to upload, we recommend placing them all in a folder, then creating a ZIP file containing all the files in that folder and upload that file
6) The recipient should receive an email with a link to the files, and you should also receive a copy if you put your own address in the CC: field.
If you have any problems sending files to us, please contact us <http://www.k-state.edu/uprint/contact-us/> for assistance.
How to count originals. (Top)
Imagine that you are reading a novel. You start on page 1. You read it and flip to the next page—page 2. Counting pages for any printed piece is just as simple!! When we refer to “originals” we are referring to the printed pages that you will give us to reproduce from or number of individual pages in your doucment.
 If your originals are 2-sided, like a novel, count all of the sides INCLUDING BLANKS.
If your originals are all 1-sided, you simply count the number of pages (originals) that you have. DO NOT COUNT THE BLANK BACKS WHEN GIVING NUMBER OF PAGES!!
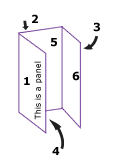
Brochures are counted by panels. If you are printing a simple tri-fold brochure on a piece of 8½ x 11 paper there would be three panels on each side of the paper. Thus it is considered a 6 panel brochure.
7 things to avoid when building your files. (Top)
1) Do not use type styles (shortcut keys) to italicize or bold fonts. These faked styles may look fine on screen and even in laser output, but often will not work in high resolution output. Use only the italic or bold font variations that are displayed in the font menus.
2) Never copy a picture from one application and place it into a picture box via the Paste command; the pasted image will be a PICT file. Always use the get Picture/Place command (File menu) from the program you are using.
3) Do not use JPEG files. They can be imported, but they are usually low resolution and not suitable for high end output.
4) Try to avoid rotation imported images in your program. This slows output. Rotate them in their original program like Photoshop or Illustrator.
5) Try to avoid scaling imported pictures in your program. When creating pictures, whether bitmaps or vector-based, try to produce them at or near their intended size before importing them. This is especially important with bitmap TIFF and bitmap EPS files; less so with vector EPS files.
6) The background color of picture boxes should be 100% white or transparent when using either grayscale or CMYK color TIFF files.
7) Do not use hairline rules. Make your thinnest lines at least .25 points wide and your thinnest dotted rules at least .5 points wide.
Use of university logos and seal. (Top)
One of the most commonly asked questions at University Printing has to do with the use of the official University logo, seal and the notice of nondiscrimination. We thought we would clarify a few things regarding the policies that govern their usage.
University Logo
University Publications is responsible for the development, design and use of the University logos and has established guidelines for publications that are intended for external audiences. Policies regarding when and how to properly use the logos, seal and nondiscrimination clause are outlined in Chapter 3330 of the Policies and Procedures Manual (PPM) and can be found on the K-State University website: www.k-state.edu/policies/ppm.
University Printing works closely with the staff of University Publications and adheres to the policies and guidelines set forth regarding the use of the K-State logo and University seal. The Kansas State University Logo: Section .070 states that the Kansas State University Logo must appear on all publications. It must also appear on all letterhead, envelopes and business cards in a standard format. Guidelines for proper usage are available from University Publications and University Printing.
We occasionally receive requests for letterheads and business cards that do not meet the set standards. Variations from the guidelines (e.x. adding another logo) must be authorized by University Publications before we are able to complete the customer’s request. Please contact Sharon Morrow at 532-6419 in 5 Anderson Hall.
University Seal
There are two versions of the University seal. The seal that reads “Kansas State University of Agriculture and Applied Science” is the official version and may be used only with the permission of the director of University Publications. The seal reading “Kansas State University, February 16, 1863” may be used without permission. Copies of the seal are available from University Publications and K-State University Printing.
Notice of Nondiscrimination
All publications used to publicize programs and activities, to recruit and enroll students, and to recruit employees must include the notice of nondiscrimination as required by both federal and state legislation and University policy.
For example, college and department brochures and posters used to recruit undergraduate and graduate students, newsletters, including those for students or alumni, and conference brochures are some of the publications that require the notice of nondiscrimination. The notice must appear on publications regardless of funding source, the office that edits or designs the publication, or location of printing.
The above information is an excerpt from Chapter 3330. We encourage our customers to visit the PPM website at: www.kstate.edu/policies/ppm to read all of the information available. It should be noted that University Printing is not authorized to make decisions regarding these policies or to give exceptions to the guidelines.
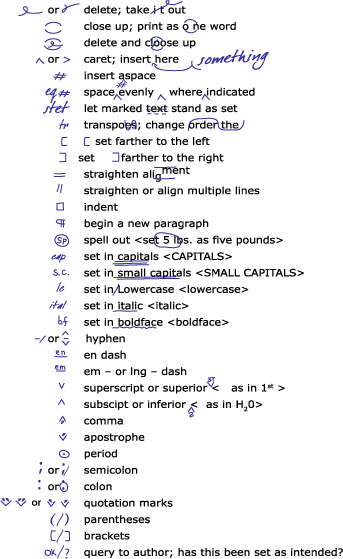
Proofreading marks. (Top)
How do I fill out the order forms? (Top)
I am sure we have all said it at least once before when we have ordered a print job – “I just need.” When you are ordering a job it may seem like a very simple task to you because it is your concept and you have been working on it and have put the project together. But remember, this is the first time that we have seen the job and we need as much information about your specific job as possible so that you receive your job looking the way you intended. That is the reason why when you bring in a job we will always ask for a printing requisition. This is different than an office requisition. Our printing requisitions will give us the specific information needed to proceed with your particular print job. Printing requisitions tell us what kind and color of paper you want, how many colors of ink to use, what size it should be, and how many pages it is. Below you will find copies of our order forms with some helpful tips on what some of the terms mean. If you have had an estimate done prior to ordering your project indicate that on the requisition. Fill out the appropriate form as completely as you can and if you have questions please feel free to call. It is very important that you give us a phone number where we can contact you if we have questions about your job. Provide us with a date that you need the job, ASAP does not necessarily mean the same to us as it does to you. Please order a quantity of finished pieces by number not by box – we have different size boxes.
When you submit your job it is a good idea to submit a hard copy, even if it is black and white, or a reprint. That way we know what you are expecting your finished piece to look like.
The Printing Order/Requisition
|
Design/Layout
|
Paper/Ink
|
Mailing Department
|
The Letterhead Order
The most common question asked when people place their order for letterhead is which paper did I use last time? The easiest way to determine the type of paper your letterhead is printed on is to hold the sheet up to the light and see if it has a watermark. If it has one that says 25% cotton it is the 25% Cotton bond on the order form. The 20# bond paper is similar to paper you would use in your copiers and desktop printers.
|
The Envelope Order
|
The Business Card Order
|
The Mail Only Order
|
The Wide Format Poster Order
|
The Memo/Routing Slip Order
|
My business does not maintain a mailing list with an address-update cycle. How does the address-update standard apply when my customer provides an address? (Top)
If you send the mailpiece to the address within 95 days of the date the address was provided, the address complies with the Move Update requirement. If you use the address 95 days or more after it was provided, you must use an on-piece ancillary service endorsement for address correction (or another update tool such as FASTforward). In most instances, if the mailpiece is mailed shortly after the address was provided, the address will not change, and the mailpiece will be delivered as addressed.
Does a list or an address have to be updated every 95 days? (Top)
An address can be updated any time, so long as it is updated within 95 days before the address is actually used for a First-Class Mail discounted mailing. If a mailer mails a list once every 2 years, that list would have to be updated using one of the Move Update methods before the mailing.
Can I hand apply my labels and bring the project over to University Printing to bulk mail for me? (Top)
Pieces that are self labeled and sorted and have not had the Move Update process completed on the labels MUST use an Ancillary Service Endorsement on their mailpiece. To complete the Move Update process, the mailer must make the address changes recieved as a result of the approved Ancillary Service Endorsement to their database.
![]() Adobe Acrobat Reader is needed to download and print PDF files.
Adobe Acrobat Reader is needed to download and print PDF files.
You may download it free.
