Styles - Word for Mac 2008
The template uses a feature in Word called “styles.” A “style” is a set of formatting characteristics that is applied to a portion of text. These characteristics can include any elements that define the appearance of text in your document: font, font size, font color, bold, underline, line spacing, indentation, centering, numbering, etc.
A specific set of characteristics can be saved and given a name. For example, the style named “Body Text” is applied to paragraphs in the template. (In earlier versions of the template, this style was named “Normal“.) The style “Heading 1” is applied chapter headings in the template.
With a long document like an ETDR, it’s essential to use styles to create a structured document. This can be done by using the same style for similar elements in your document. For example, use the same style for all chapter headings. Use another style for all first level subdivisions within a chapter. If you need to change the appearance of your document, it’s easy to make changes in the appearance of the style which will then be reflected throughout your document. For example, if you wanted to change all chapter headings from left justified to centered, you would only have to make one change to the style, rather change each chapter heading. Details on how to modify styles are provided later in these instructions.
Configure Word for working with styles
To work with Styles, it’s best to have Word configured with these settings:
- Use Normal view
- Style Area visible (at left side)
- Styles displayed in the Formatting Palette (at right side)
- Use Page Layout to check your page numbering
- Display Field Shading
- Display the Paste Options menu
- The table below shows how to configure these settings.
Table 1. Basic Configuration for Word for Mac 2004
|
To make this setting: |
Follow this sequence of menus: |
|
Normal View The Style Area is visible only in Normal View |
View | Normal |
|
Style Area Displays at the left side of the screen and shows Styles applied to each portion of your document. |
Word | Preferences | View | Style Area Width (1”) | OK |
|
Formatting Palette Displays at right side of screen and shows a list of available Styles. |
View | Formatting Palette | Styles | Available Styles |
|
Page Layout Displays page numbers (not visible in Normal view) |
View | Page Layout |
|
Field Shading Places a gray background in fields auto-generated by Word, including Table of Contents, List of Tables, etc. |
Word | Preferences | View | Field shading: (Always) |OK |
|
Paste Options Displays the Paste Options menu after you paste a selection |
Word | Preferences | Edit | Show Paste Options buttons | OK |
Once you have Word configured in this way, your Normal view should look like this:
Figure 1. Style Area and Task Pane
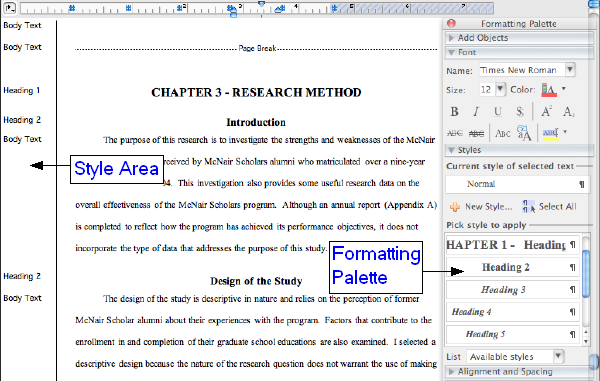
The Style Area (at the left) indicates the style applied to a specific portion of text. Notice these styles in the figure above:
- Heading 1 is applied to the “Chapter 3 - Research Method” title.
- Heading 2 is applied to the “Introduction” and “Design of the Study”subheads.
- Body Text style is applied to the paragraphs and blank space between. In earlier versions of the template, this style was named Normal. Normal and Body Text have the same formatting, so it's ok to use either style.
The Formatting Palette displays a list of all available styles and is useful if you want to apply a different style to some text or to modify the appearance of a style.
Styles Used in the ETDR Template
The chart below shows the style applied to each section of the ETDR.
Table 2. ETDR Styles
|
ETDR Section |
Style |
Subheading Styles |
|
Abstract title and title page text |
Title Page | |
|
Copyright heading |
Page Heading | |
|
Abstract heading |
Page Heading | |
|
Table of Contents heading |
Page Heading | |
|
List of Figures heading |
Page Heading TOC |
|
|
List of Tables heading |
Page Heading TOC |
|
|
Acknowledgements heading |
Page Heading TOC |
|
|
Dedication heading |
Page Heading TOC |
|
|
Preface heading |
Page Heading TOC |
|
|
Chapter heading |
Heading 1 |
Headings 2, 3, 4 |
|
References/Bibliography heading |
Page Heading TOC |
|
|
References/Bibliography entries |
Bibliography |
|
|
Appendix heading |
Appendix A - Heading 6 |
Headings 7, 8, 9 |
|
Text (abstract, chapters, appendix) |
Body Text or Normal |
Apply a different style
As you work with your document, you may need to change the Style assigned to a particular portion of text. Follow these steps:
- In the Style Area at the left, click the style on the text you want to change. This selects all the text that is using that style.
- In the Formatting Palette, click the style you want to apply.
For example, to change a subheading from “Heading 2” to “Heading 3,” click “Heading 2” in the left Style Area to select the subheading, then click “Heading 3” in the Formatting Palette at the right. It’s that simple.
Modify a style
Styles in the template meet all formatting requirements of the Graduate School. If you want to make any changes in this formatting, it’s best to use the Modify Styles feature. It’s possible to make extensive changes in the appearance of a style, but the basic steps are as follows:
- In the Formatting Palette, point to the style you want to modify. A down arrow will appear. Pull down the arrow and click Modify Style.
- Click the attribute you want to change.
- To see more options, click Format, and then click the attribute — such as Font or Numbering — you want to change.
- Click OK after you've modified the attribute, and then repeat for any additional attributes you want to change.