Shortcuts for Navigating Through Word Documents - Word for Mac 2004
Keyboard Commands for Moving the Insertion Point
Use these keyboard commands to quickly position the insertion point (cursor) in your document. These commands work with the Apple Keyboard and may not work with the keyboards on MacBook laptop computers.
|
To move to |
Press |
| End of line | Command+End |
|
Beginning of line |
Command+Home |
|
Beginning of current paragraph |
Command+up-arrow |
|
Beginning of next paragraph |
Command+down-arrow |
|
Beginning of document |
Command+Home |
|
End of document |
Command+End |
|
Preceding insertion point |
Shift+F5 |
Go To Tab
The Go To tab in the Find and Replace dialog box is a powerful tool for moving quickly through a large document. Follow these basic steps:
Step 1: Open the Go To tab using one of these methods:
- On the Edit menu, click Go To
- Hold down the Command key and press G
- Press F5
You should now see the Find and Replace dialog box with the Go To tab selected:
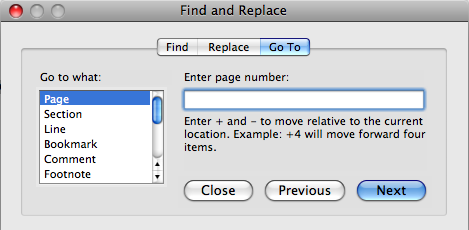
Step 2: In the Go to what: menu, click the desired category. Choices include the following items:
- Page
- Section
- Line
- Bookmark
- Comment
- Footnote
- Endnote
- Field
- Table
- Graphic
- Equation
- Object
- Heading
Step 3: Click the Next button to move to next location. Alternatively, you can move to specific location. For example, to go to page 95, follow these steps:
- Open the Go To tab.
- In the Go to what: box, click Page.
- Enter 95 in the Enter page number: box.
- Click the Next button.
Notice the name of the Enter box changes according to the item selected in the Go to what: box. For example, if you select Table in the Go to what: box, the Enter box changes to Enter table number.
Split and New Window
The Split Window allows you to open two separate Word panes on your monitor and view a different portion of your document within each pane. To turn on Split Window, follow these steps:
- On the Window menu, click Split
- A horizontal split bar appears in the document window.
- Drag the split bar to where you want it, and then either click the bar or press Enter.
- To return to a single window, click Remove Split on the Window menu.
This method can split the window only horizontally, not vertically. If you prefer to work in two "panes" that are arranged side by side instead of top and bottom, open the document in a second window. Do this by clicking New Window on the Window menu, and then arrange the two windows side by side.
Select Browse Object Button
The double-headed arrows at the bottom of the vertical scroll bar allow you to move up or down through your document by the unit defined by the Select Browse Object button. This is the small, circular button that appears between the up and down arrows.

Click the Select Browse Object button to select the browse unit. Choices include section, endnote, footnote, table, graphic, heading, edit, etc.
For example, if you want to quickly browse through each table in your document, follow these steps:
- Click the Select Browse Object Button.
- On the palette, click the icon for Table.
- Click the up or down double-headed arrows to move to the next or previous table.
Table of Contents
To jump to any location listed in your Table of Contents, point to the location and click.