Upload Files - Updated UI
| SWITCH TO THE UPDATED INTERFACE If you signed in to the legacy interface switch to the updated interface. Click your username (top right), select 'ApplyWeb CRM' or 'Updated UI'  |
||
| UPLOAD FILES Use this process to add or replace files (documents, transcripts, statements, evaluations, etc.) in an application. |
||
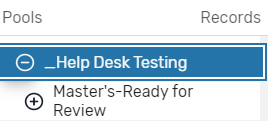
|
1 - Select the Pool Folder Select a pool folder (left side of view) to see a list of application records: |
||
|
2 - Choose the Record Choose an application record from the list; click View to open the record: |
||
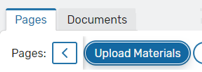
|
3 - Select Upload Materials On the Pages tab, select the Upload Materials page: |
||
|
4 - Enable Edit Mode Select Edit to start editing mode (if not already selected): . |
||
|
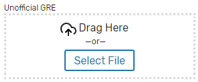
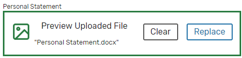
5 - Choose an Upload Option Options to upload or change files in an application will differ depending on whether an existing files has already been uploaded and will also depend on the document type. Look for the following options: |
||
| Drag Here or Select File: |
Shown for some files where no existing file is present. |
 |
| Manage: |
Used for transcripts and recommendations. |
|
| Upload: |
Used for transcripts and recommendations. |
|
| Preview / Clear / Replace: |
Shown for managed files. Clear will remove the file, Replace will overwrite the file with a new file. (Be cautious, the changes cannot be undone). |
 |
|
6 - Finish Editing Mode For best practice, select Save or Save & Exit . File changes are saved as you carry them out. If you made other editing changes to the record, be sure to save your changes. If you select Cancel, any files you replaced/uploaded will still be saved, but any record edits will not be saved. |
||