Frequently Asked Questions
With the multitude of design software available today, many people create their own newsletters and brochures before they take them to a printer. Unfortunately, because of constantly changing technology, sometimes we receive files we are unable to access. To minimize these problems, we suggest you consult with us BEFORE you begin any work. Here are some common questions asked of University Printing.
University and state policy states that all printing work paid from state administered funds should be referred to University Printing or another state contracted vendor. It is not necessary to go through procurement or state purchasing when ordering directly from University Printing, which usually saves time and money.
Our services include everything from quick copy services, printing, signs, direct mail, decals, promotional products, shipping services, and more!
We recommend saving and submitting your artwork as a PDF file whenever possible. PDF files are easier to process and typically result in faster turnaround times. Please ensure your PDF includes embedded or outlined fonts and is flattened before uploading.
In addition to PDF files we also accept the following file formats:
-
JPG, JPEG, TIF, TIFF, EPS, and DOC
-
Files created in Microsoft Publisher, Word, and PowerPoint
Files created in Canva, Microsoft Publisher, Word, and PowerPoint. Please save your artwork as a PDF before sending it to avoid margin shifting and other potential problems.
If you are concerned about color accuracy, we can provide a hard copy proof for a small fee, but please allow extra time for this.
Roll Label Design Recommendations
-
Submit vector files (PDF or EPS preferred)
-
Use a minimum resolution of 300 DPI
-
Use 100% K black for all black elements
-
For fine lines and text smaller than 9pt, use black (100% K only) to ensure clarity
Don't hesitate to contact us with questions about file prep or project requirements—we’re here to support you every step of the way. If you’re unfamiliar with the printing process, we’re happy to help. We offer facility tours and can guide you through the tools and formats that ensure your project runs smoothly.
When grayscale images are converted to CMYK, they can sometimes experience unwanted color shifts—often appearing with a colored tint in the final print.
What You See vs. What You Get:
-
On Screen: Your image appears as clean grayscale. Keep in mind that your screen uses the RGB color mode.
-
After Printing: Subtle tones of green, yellow, or other colors may appear.
Why This Happens: In a CMYK document, grayscale images should only contain values in the K (black) channel. If any C (cyan), M (magenta), or Y (yellow) values are present, it can result in inconsistent color reproduction during printing.
Always double-check your final CMYK document to confirm that grayscale images are using only the K channel. This small step helps maintain consistent, professional-looking results. If it is an option, you can also change photos to grayscale.
When printed in CMYK, black can look slightly lighter than expected. For a richer (darker) black, use a CMYK setting of C=30%, M=30%, Y=30% and K=100%. This is known as Rich Black.
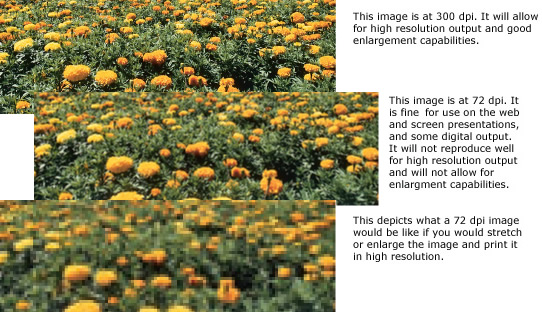
Images pulled from websites or digital publications are often set at 72 DPI (dots per inch)—a resolution optimized for screens, not for print. Using these low-resolution images can result in pixelation, where graphics appear blurry or blocky.
To ensure your printed materials look sharp and professional, always use images that are at 300 DPI or higher. If you’re using web graphics, consider locating the original high-resolution file or finding a suitable alternative.
Common Causes of Pixelation:
-
Using low-resolution (72 DPI) images
-
Losing links to image files in your layout software if you send native files
(This happens when images aren't sent along with the document; when opened on another computer, the software can't access the original files and substitutes low-quality previews.)
Best Practices:
-
Always scan or source images at 300 DPI or higher
-
Make sure all linked images are included with your artwork submission
-
Double-check your file resolution before sending
Low-resolution files may either be printed as-is—with visibly reduced quality—or placed on hold while we request replacements, which can delay your turnaround time.
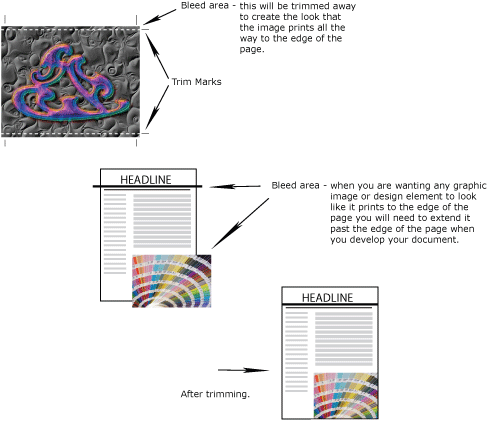
A bleed refers to any part of your design—whether it's an image, background color, or graphic element—that extends all the way to the edge of the finished page.
Since printers can't print to the exact edge of a sheet, your document is printed on a larger piece of paper and then trimmed down to size. This trimming ensures that the image or color truly extends to the edge without leaving any unintended white borders.
How to Set Up Bleeds Properly: To achieve a clean, professional look, you’ll need to extend your design slightly beyond the final trim size. This allows for minor shifting during cutting. For example, if your final piece is 8.5" x 11", you should design it at 8.75" x 11.25" to include the required bleed and keep all required text and artwork well inside the 8.5" x 11" final size.
Key Bleed and Margin Guidelines:
-
Standard Bleed: Extend artwork 0.125" beyond each edge.
-
Booklets & Presentation Folders: Require a 0.25" bleed.
-
Keep all important text and elements at least 0.25" inside the final trim line. We call this the safety margin. This keeps your essential elements inside the mechanical tolerances of our paper-cutting equipment.
Including bleed not only improves the visual quality of your printed piece but also ensures a polished, edge-to-edge finish that meets professional printing standards.
With the recent budget cuts and restraints, cost is very important. With several different printing methods for you to choose from, it can be difficult to determine which to use. When it comes to cost there are several items that determine your final price. Estimates can help you plan printing orders. To get the most accurate estimate for your job, be specific and provide as much information as possible. From this point we can discuss job specifications, and make suggestions to help you cut costs but still have the quality piece you desire. Some ideas could be:
- Have your file ready and proofread when you bring it in. Thorough proofing should be taken seriously and is necessary to avoid costly re-runs.
- Allow us enough time to do the job in the most cost efficient way. Practical planning is the most important key; know ahead of time exactly what you want.
- Printing on standard size paper and not bleeding the image off the page will help with cost control.
- Be sure of mailing list counts. Do not print over what you need so you will not have a large carryover, unless you have plans to distribute the extras. It will be more economical to print extras at the time than to order more later.
- Create documents to be self mailers instead of using envelopes.
Imagine that you are reading a novel. You start on page 1. You read it and flip to the next page—page 2. Counting pages for any printed piece is just as simple!! When we refer to “originals” we are referring to the printed pages that you will give us to reproduce from or number of individual pages in your doucment.
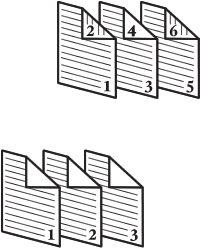 If your originals are 2-sided, like a novel, count all of the sides
INCLUDING BLANKS.
If your originals are all 1-sided, you simply count the number of sheets (originals) that you have and you would not count the blank back pages to determine your page count.
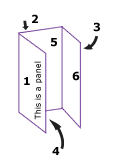
Brochures are counted by panels. If you are printing a simple tri-fold brochure on a piece of 8½ x 11 paper there would be three panels on each side of the paper. For a standard 8.5" x 11" trifold brochure, each panel will be 3.67" wide and 8.5" high.
One of the most commonly asked questions at University Printing has to do with the use of the official University logo, seal and the notice of nondiscrimination.
University Printing works closely with K-State's Division of Communications and Marketing to provide guidelines for publications intended for external audiences. Policies regarding when and how to properly use the logos, seal, and nondiscrimination clause are outlined in Chapter 3330 of the Policies and Procedures Manual (PPM) and can be found on the K-State University website.
Please contact us if this is a service you are interested in.
University Printing holds a Canva Business account, you are welcome to send a "Collaboration" link to uprint@ksu.edu.