Faculty and Staff User Guide
This guide walks you through the steps for setting-up and editing your Wildcat Scholar research portal.
Need help? Email the Wildcat Scholar team at wildcatscholar@k-state.edu.
Your search settings may have been pre-configured for you during the Wildcat Scholar launch. Please exercise caution when making changes. Email wildcatscholar@k-state.edu for help.
Most search settings will be set as follows:
- Name: Last, First two initials (e.g., Smith JC)
- Address: Kansas State University (and “Manhattan”)
- Other Identifiers: Linked when available (e.g., ORCiD, Scopus Author ID, ResearcherID, Dimensions ID)
If you don’t see your publications, or seeing too many, modify settings as follows:
- Log into Elements and choose Profile & work > Tools & settings > Search settings.

- Scroll down to Name variants. Enter any published names and click ADD.

- Scroll down to Addresses. Add other institutions or cities where you've worked. Tip: exclude the words “College” and “University” to reduce false positives. Click ADD.
- Scroll to the bottom and click SAVE.
Hints to Improve Search Settings
- Names: Add a separate name variant for every name you’ve published under — maiden names, alternate first names, etc.
- Address: To pick up publications from before your time at K-State, add the city of previous institutions. Use cities (not city + state) to keep results clean. Example: if you were at the University of California–Berkeley, add “Berkeley.
- Start date: If you’re getting too many results from before you began publishing, add the year you started publishing. Use this carefully and only when relevant.
- Keywords: If you publish in a specific field with consistent author-supplied keywords, you can constrain your search to those keywords. Use very carefully — a missing keyword will exclude an otherwise relevant article.
- Journals: If you publish in specific journals, you can add them to your search settings. Use cautiously — this restricts the search to those journals only.
- Sources searched: By default Elements searches a number of multi-disciplinary and discipline-specific databases. If you see a database in the “Source-specific settings & overrides” section that isn’t enabled but might capture more of your work, activate it by clicking the box in the SEARCH BY NAME column.
Still Seeing Erroneous Results?
You may see publications coming in through the automatic search that are not yours. The simplest way to clean these up is to reject them on the Claim or Reject page (see Claiming and Rejecting). If you’re not seeing any relevant results, you’ll need to broaden your search settings.
If you have a common last name, you’ll encounter this problem more often. To prevent excess erroneous results, we recommend working with Elsevier to clean up your Scopus Author IDs. Email wildcatscholar@-state.edu for assistance.
Rejecting Publications
Rejected publications won’t be returned in future searches. If you reject an article in error, visit the Rejected tab on the Scholarly & creative works page and reclaim it.
Re-running the Automated Search
The search will rerun about an hour after you modify your search settings. To force an immediate run, go to Search Settings and click Run my Searches.
Adding publications manually should be a last resort. It works best when you use a unique identifier such as a DOI for journal articles or an ISBN for books. Follow these steps to manually add the citation information for your journal articles, books, or book chapters.
Manually Adding a Journal Article
- Click + ADD NEW in the Scholarly & creative works section on your Elements homepage.

- For AI Assist Entry, copy and paste the article information into the text box. For Type, choose Journal article from the list of publication type options. Click Next.

- For Manual Entry, choose Manual entry at the top of the box. Then, choose Journal article from the list of publication type options.

- Use the search box to search for the article by title or DOI. If your article doesn't appear, click Go to next step at the bottom of the page.

- Enter the article information into the fields shown. Required fields are marked by red asterisks:
- Relationship with the journal article (author, editor, etc.)
- Sub Type (article, review, letter, etc.)
- Title
- Authors
- Co-authors at K-State: Search for the author by first and last name. If they're identified in Elements, select “Yes” for the K-State co-author.
- Co-authors not at K-State: Add manually by entering last name and first initial. Then select their Author Type (e.g., corresponding author). Click Add.
- Status (unpublished, submitted, accepted, in preparation, published, published online)
- All other fields are voluntary; add information that's useful for your subject and discipline.
- Click Save at the bottom when finished.
- If you need to add or revise the content of this manual record, use the Edit button on the publication record page.
Manually Adding a Book or Chapter
- Click + ADD NEW in the Scholarly & creative works section on your Elements homepage.
- Choose Chapter from the list of item type options.
- Verify the book/chapter is not already in Elements by searching for the title or DOI.
- Click Go to next step at the bottom of the page.
- Enter the book or chapter information into the fields (relationship, title, authors).
- Tip: To import multiple items at once, see Bulk Import.
Elements collects data about your publications from multiple external data sources, such as Scopus, Web of Science, and CrossRef. It automatically merges records of the same publication appearing in different sources based on their DOI. You can view the various sources from which a publication was pulled in your “My claimed scholarly & creative works.

Occasionally, Elements may recognize the same publication, or versions of the same publication, as two separate records (e.g., a preprint pulled from K-REx and the final published article pulled from Scopus). In these cases, you can merge the records so they appear as a single publication on your CV and Wildcat Scholar profile.
Merging Individual Publications into a Single Record
- From your home page, click Scholarly & creative works, then Manage scholarly & creative works in the right hand corner of the box.

- For each publication you want to merge, click the kebab menu icon and choose Add to workspace.

- Open the workspace from the drop-down in the upper right next to your name and select Workspace.

- Check the boxes for the items you want to merge, then click Join. The records will now appear as a single publication.
Splitting a Publication into Separate Records
From My claimed scholarly & creative works, click the Data sources tab on the record you want to split. Click the split (forked-arrow) icon next to the version you want to separate. Confirm when prompted — the record will now appear as two publications.
Elements lets you generate a full CV in PDF or Word format from the information in your profile.
To Create a CV
- From your Elements homepage, click Menu. Under Search & reporting, click CVs & Individual reports.
- Check the box for Academic CV and click the RUN button. Specify a date range if you want the CV to capture only publications and professional activities from a particular period. Note: biographical information will not change when you set a date range.
- Choose Word or PDF format. Word is easier to edit. Click RUN.
An ORCiD is a unique, persistent identifier designed to solve the problem of name ambiguity in research. Your ORCiD ID stays with you throughout your career and is used to identify you to publishers, funders, and other researchers.
Need to create an ORCiD or associate yours with K-State? Email wildcatscholar@k-state.edu or visit orcid.org/register to get started.
Adding your ORCiD to your Elements profile lets you push publication and grant information from ORCiD to Elements (and vice versa), so you only need to enter data in one place.
To add your ORCiD to Elements, select the Profile & work tab in the lefthand menu, then select My research identifiers.

Based on your search settings, Elements automatically pulls data about your publications from external sources such as Scopus, Web of Science, and CrossRef.
When you log in, the MY ACTIONS box will indicate whether you have pending publications to claim or reject.
To Claim or Reject Pending Publications
- Click CLAIM NOW in the MY ACTIONS box to go to your pending publications.
- Review the list of pending publications. For each article, choose CLAIM or REJECT.
To Bulk Claim or Reject
Use the filters on the right sidebar to limit results for easier claiming. Use the checkboxes in front of each citation (or the Select All button at the top), then use the CLAIM or REJECT buttons at the top of the page to act on items in bulk.
Reviewing Your Previously Claimed Publications
Review your claimed publications to confirm they’re correctly attributed.
- From the homepage, click the Claimed link in the Publications section.
- Review publications on the CLAIMED tab. If any are not yours, check the box and select REJECT. Rejected publications move to the Rejected tab and can always be reclaimed if rejected in error.
- If everything is correct, no further action is needed.
Too Many Pending Records?
If you have a high number of pending publications, use the filters on the right side of the page to speed up claiming. If you see too many pending articles that aren’t yours, your search settings may need work — see Optimizing Search Settings.
Not Seeing Enough Records?
If publications are missing, see Optimizing Search Settings and broaden your search terms. You may also need to add some publications manually.
If you already have a curated library in a reference manager or in Google Scholar, you can import your bibliography in bulk. Because this is considered manual entry, use it as a last resort — metadata for manually entered items isn’t always complete.
Bulk Import from a BibTeX or RIS File
- From the Elements menu, select Profile & work > Import scholarly & creative works.
- Drag and drop your file, or click browse and find it on your computer. Note: only .bib and .ris files are supported.
- Click Open to import the file.
- Click UPLOAD.
Exporting Files from Google Scholar to Elements
- Log in to your Google Scholar author page.
- Check the box next to the article(s) you want to export.
- Click Export and choose BibTeX.
- Save the page to a folder you can find easily (Desktop or Downloads).
- Log in to Elements and follow the bulk import steps above.
- Elements will identify which records are new and which already exist. Expand each section, choose the appropriate action for each article, and click IMPORT.
Elements supports many types of teaching activities: academic advising, mentorship, courses developed, and more. K-State courses taught are imported into Elements directly from the Office of the Registrar — you don’t need to enter those by hand.
To Add Teaching Activities to Your Elements Profile
- From your Elements homepage, click + ADD NEW in the lower-left of the Teaching Activities box.
- From the pop-up, choose the entry type you want to create.
- Fill out as much information as you can, including all required fields (red asterisks). Click the question marks for help defining a field.
- Click SAVE at the bottom when done.
Wildcat Scholar supports many types of service and engagement activities outside of publications: awards and distinctions, conference attendance, expert witness testimony, professional memberships, and many more.
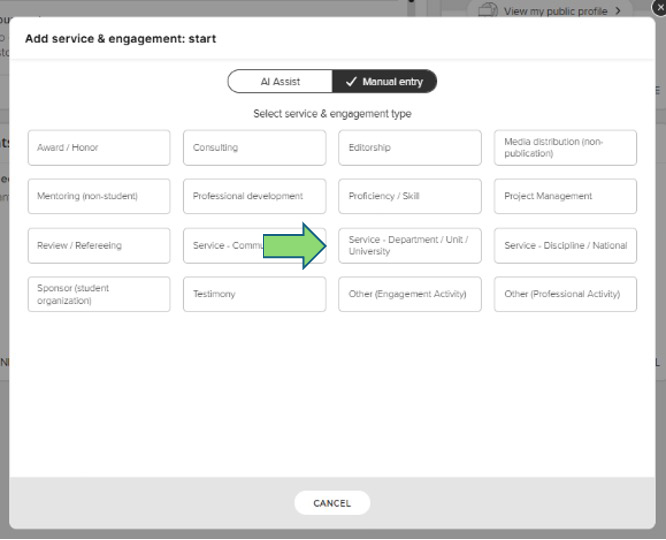
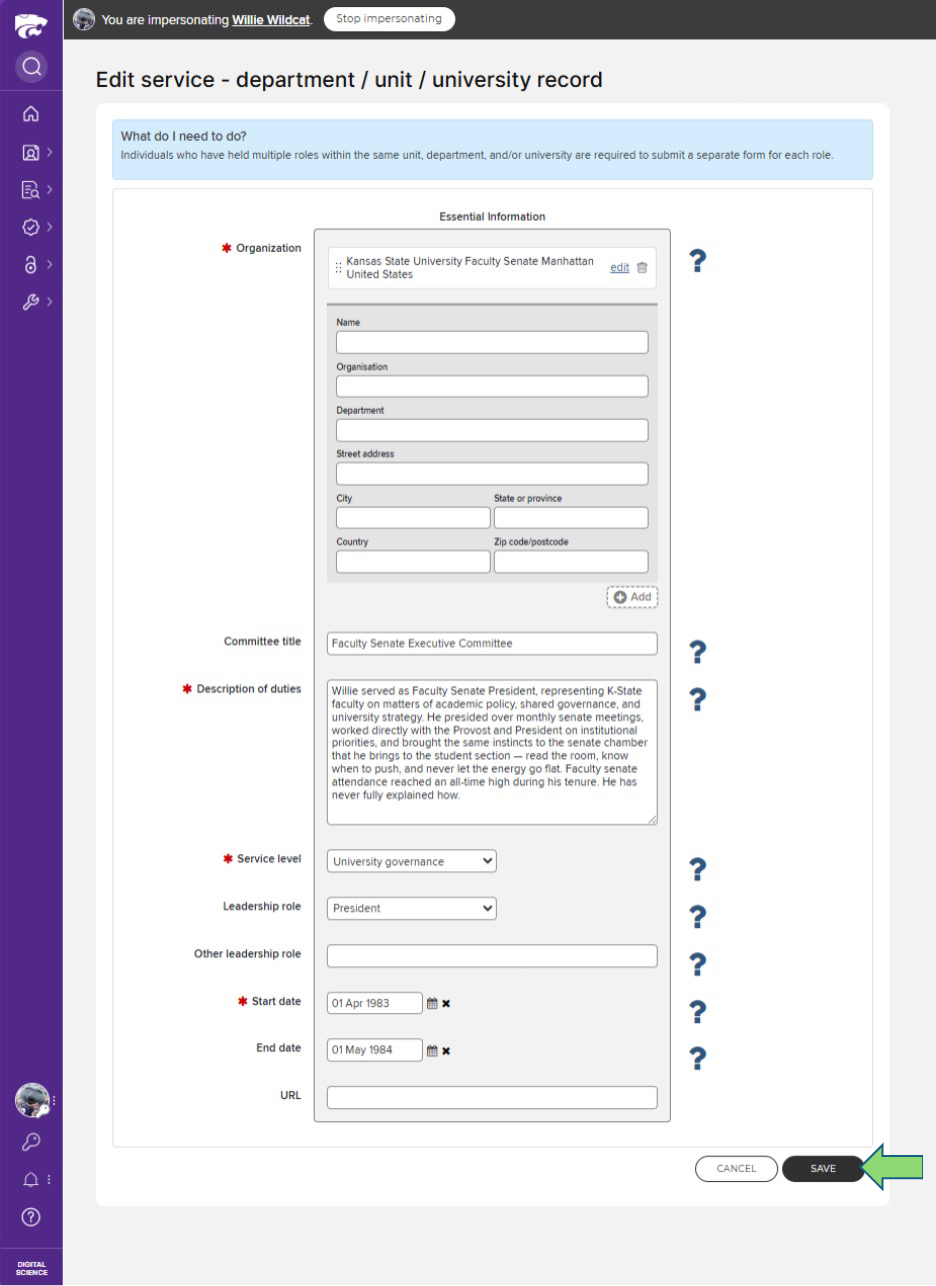
To Add Service and Engagement Activities
- From your homepage, click + ADD NEW in the service and engagement activities box.
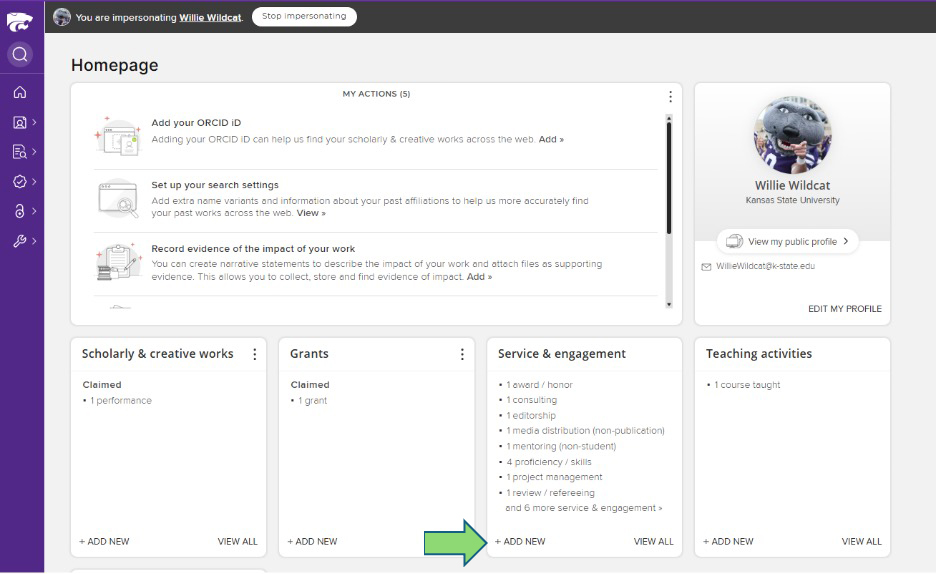
- From the pop-up, choose the category that best fits the activity.
- Fill out as much information as you can, including required fields (red asterisks). Click the question marks for field definitions.
- Click SAVE at the bottom when done.
If automated searches aren’t picking up specific articles from a database, you can add them individually. When adding individual items, use database identifiers when possible — it’s far more reliable than manual entry.
Adding an Individual Journal Article
- Find the article or item identifier in one of the databases searched by Elements.
- Hover over the Profile & work icon and select Search settings under Tools & settings.
- Scroll down to Specific article IDs. Select the appropriate database from the drop-down and enter the ID# in the Proprietary ID field. Click ADD. You can add as many items as you like.
- Click SAVE at the bottom of the page. The next time Elements runs your search, the items will be retrieved and added to your claimed publications.
Finding IDs in Different Databases
Web of Science
In Web of Science, the identifier is in the item record under Accession Number. It’s a long number preceded by “WOS:”. Don’t include the “WOS:” prefix when you enter the identifier into search settings.
Scopus
In Scopus, click an article record and look for the identifier in the URL after “/publications/”. Copy and paste this into the ID field.
PubMed
Use PMIDs — PubMed identifiers — for publications in MEDLINE-indexed journals. They’re found above the abstract on PubMed records.
arXiv
arXiv shows IDs next to each record in search results and prominently on each individual publication screen. The arXiv ID looks like ####.#####. Don’t include “arXiv” when entering the ID in Elements.
Grants data is imported into Elements from the K-State PreAward Services office (and Sponsored Programs records). This data feeds entries for external K-State grants. Internal K-State grants and non-K-State grants must be entered manually.
To Add Internal K-State or Non-K-State Grant Records
- From your Elements homepage, click + ADD NEW in the Grants module.
- From the pop-up, choose the entry type for the grant record you want to create.
- Fill out the required fields (red asterisks). Click the question marks for help.
- Click SAVE at the bottom when done.
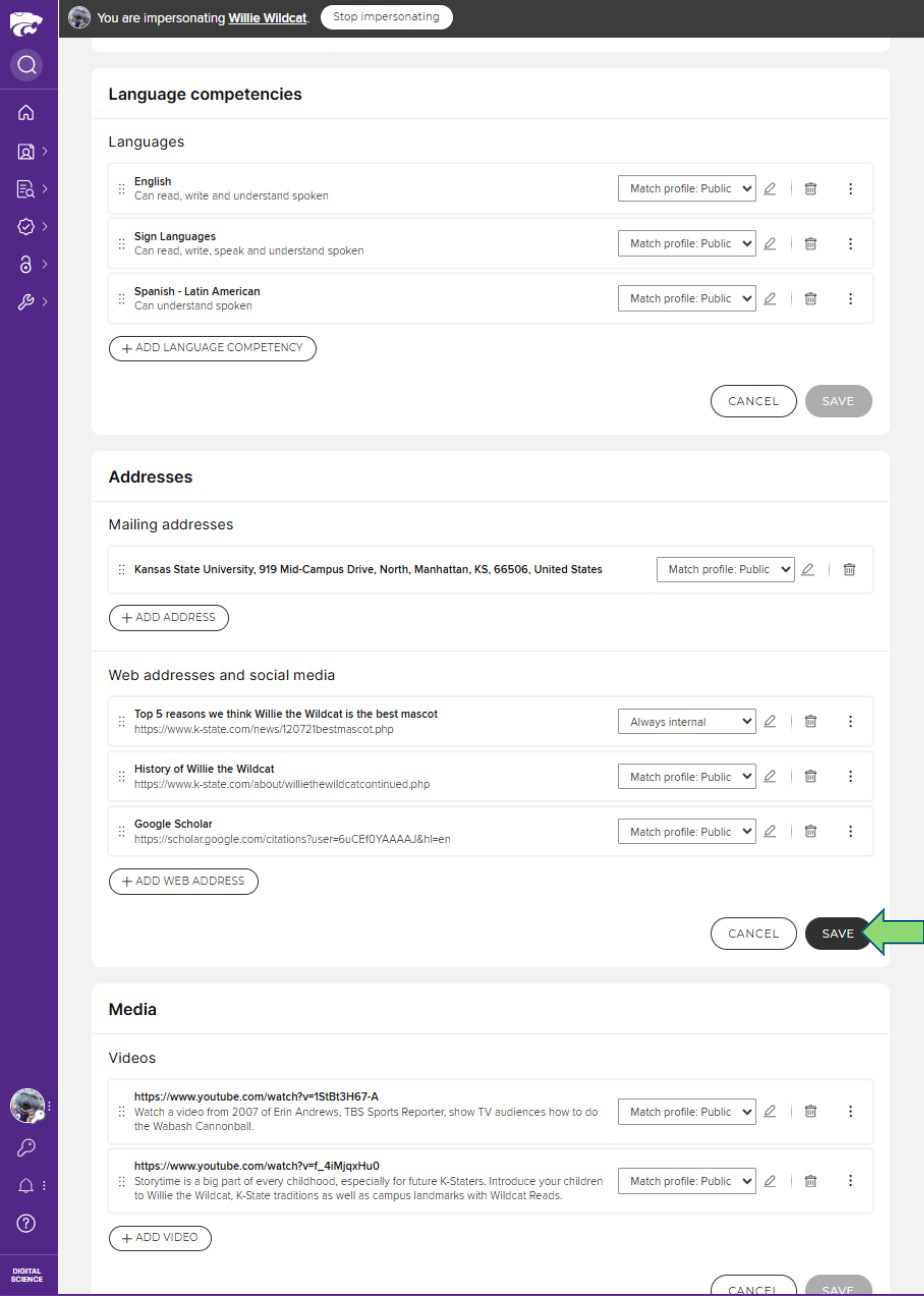
Wildcat Scholar lets you generate CVs from the information in your profile. To populate the biographical portion of those documents — and your Wildcat Scholar profile — you must add this information manually. This includes education, academic and non-academic employment, and language competencies. You can also add a photograph and links to public-facing scholarly pages such as your personal website, Google Scholar profile, ResearchGate page, etc.
To Add Biographical Information
- From your Wildcat Scholar homepage, click EDIT MY PROFILE under the photo placeholder on the right.
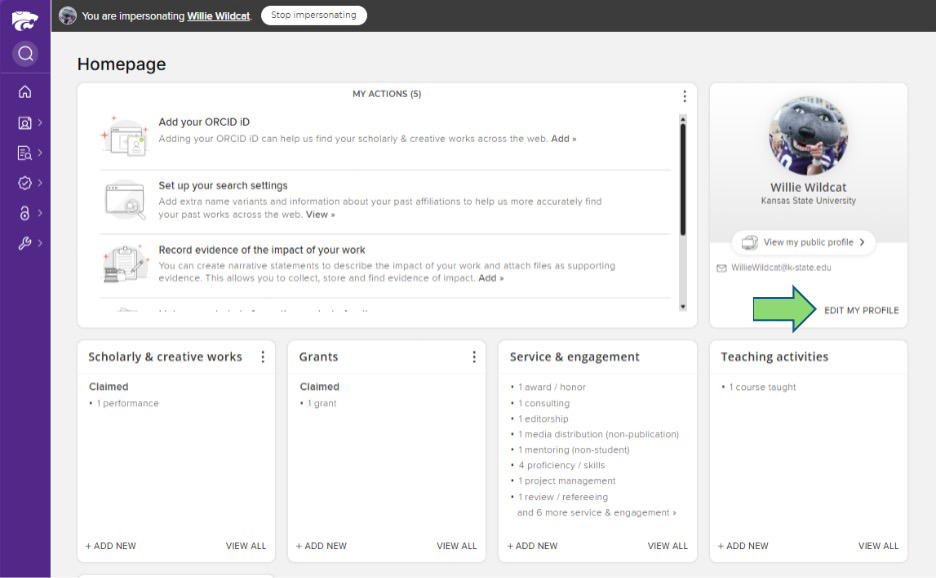
- Click the links next to the blue + ADD signs to add academic and non-academic employment, education, and language competencies. To add a website, click + ADD WEB ADDRESS
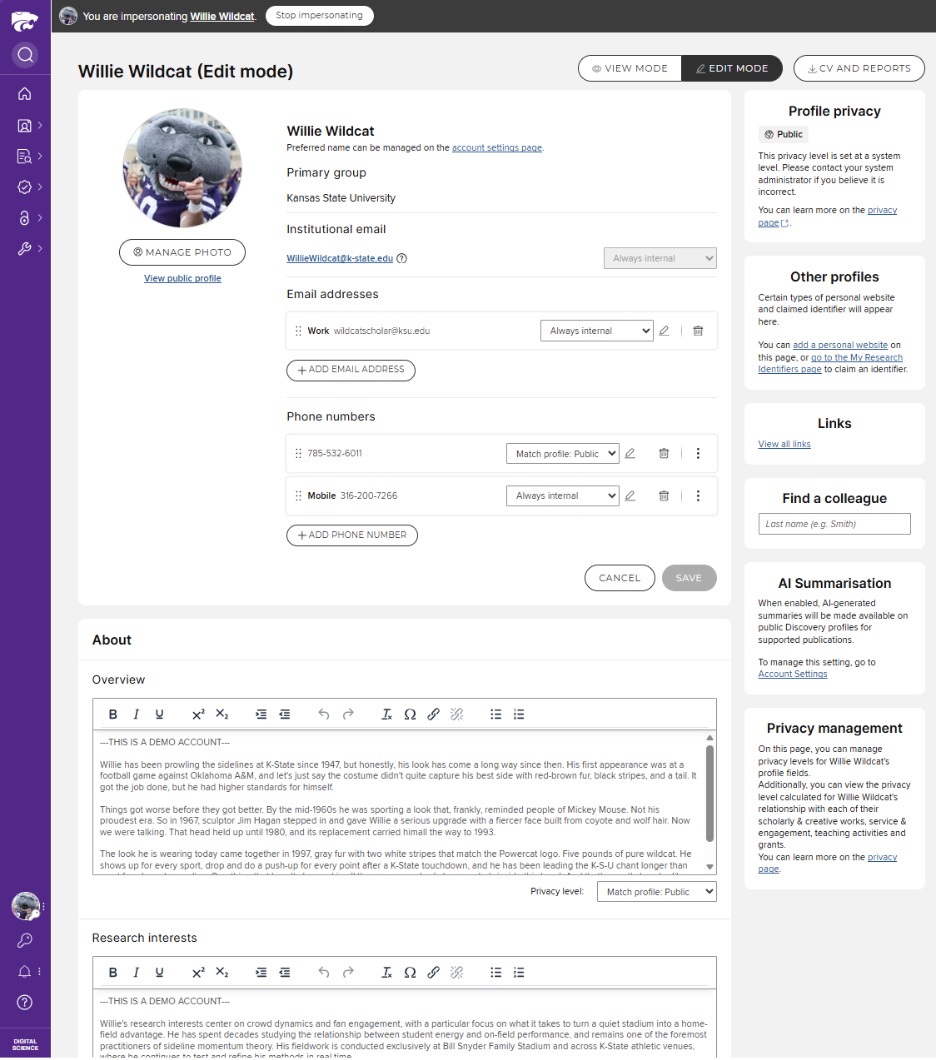
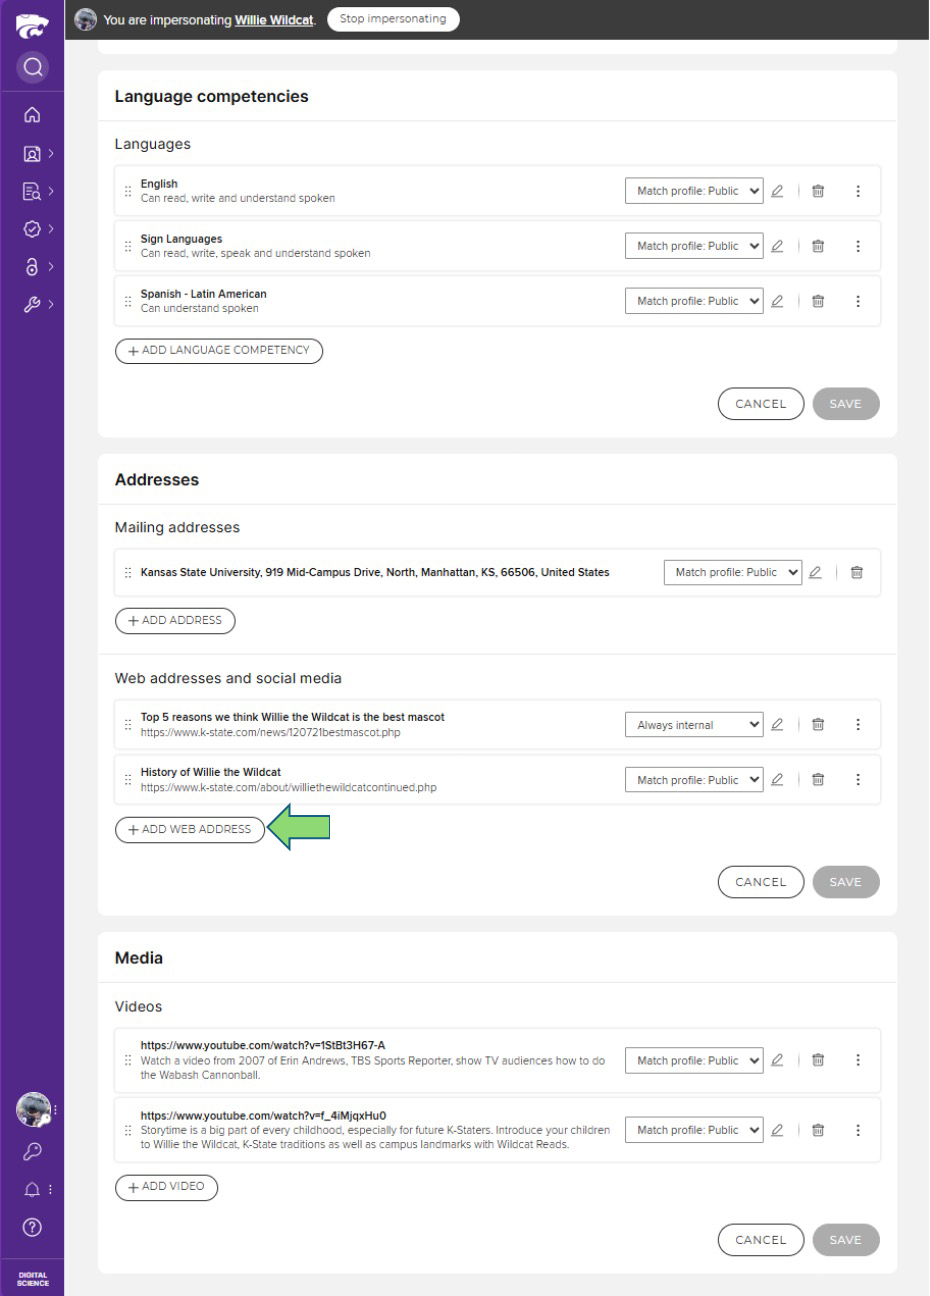
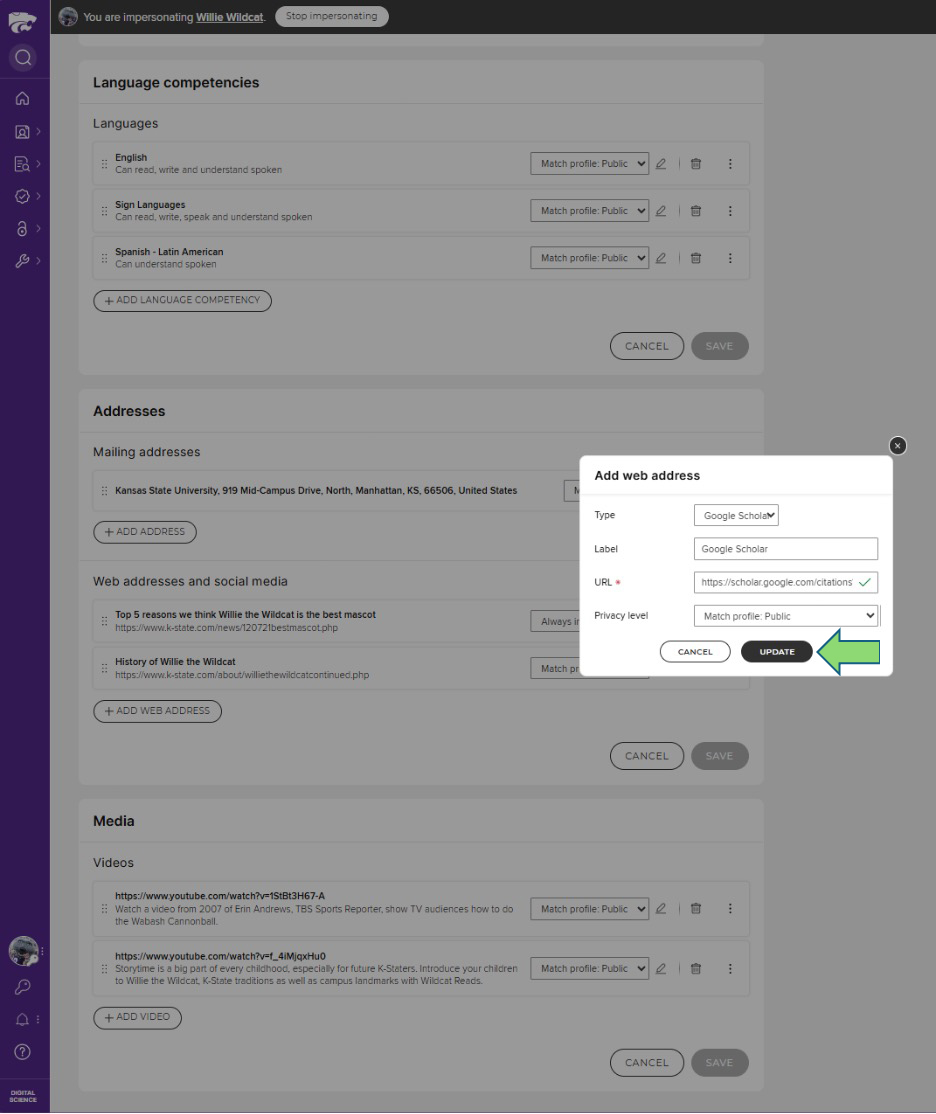
- Click SAVE at the bottom of each entry box.
Books and chapters are not included in the automatic data feed in Elements. Authors can add published books and chapters using the Elements Book Search.
Adding Whole Books
Authors can add published books using the Elements Book Search by Title or ISBN. Elements uses Google Books to pull associated metadata, which ensures accurate data and saves time.
Steps to add a book:
- Click + ADD NEW in the Scholarly & creative works box on the home page.
- Choose Book from the list of item type options.
- Search by title or ISBN. Partial titles usually work fine. Review the results and click Claim on your book.
If no results are found in Google Books, see Manual Entry.
Adding Book Chapters
Adding chapters is similar to adding books, with a few extra steps.
- Click + ADD NEW in the Scholarly & creative works box on the home page.
- Choose Chapter from the list of item type options.
- Search for the chapter by title.
- Review results in the In External Database section and click Add Chapter on your chapter.
- Review the auto-filled fields. Older books may need extra data entry. Make sure all required fields are completed.
- Click SAVE.
Books and Chapters “In Press”
To avoid duplication, we don’t recommend adding “In Press” books and chapters.
Wildcat Scholar lets you favorite or hide records on your public profile. You can do this before or after you make your Wildcat Scholar profile public.
Favoriting Records
Favorite records in your publications, grants, professional activities, and teaching activities to highlight them on your Wildcat Scholar profile.
- Scroll to the record you want to favorite.
- Click the heart icon in the upper right to mark it as a favorite. It will move to the top of the record lists on your public profile.
Hiding Records
You can hide a record in your publications, professional activities, teaching, or grants section that you don’t want to display publicly.
- Scroll to the record you want to hide.
- Click the globe icon in the upper right — this opens privacy settings for that record.
- Click INTERAL under Relationship privacy to hide the record from public view.
If you want to mark your availability for certain kinds of collaborations or engagements, you can do so on your public Elements/Wildcat Scholar profile.
Availability tag types include:
- Career Advice
- Collaborative projects
- Join a web conference as a panelist or speaker
- Media enquiries
- Membership of an advisory committee
- Mentoring (short term)
- Mentoring (long term)
- MSc or PhD student supervision
- Teaching provision
- Technical support
Enabling Availability Tags
- Click EDIT MY PROFILE.
- Scroll to the Availability section and click Manage labels.
- The Edit Labels window opens.
- Click in the search box, browse the list, and choose your tags.
- When done, click SAVE CHANGES.
- Once your Elements profile is public, your Availability tags become visible and searchable on Wildcat Scholar.
Your profile is only visible to other Elements users at K-State by default. We recommend making it public via Wildcat Scholar so peers, students, journalists, and potential collaborators can find your work.
Wildcat Scholar is K-State’s public research portal, powered by the Symplectic Elements Discovery module and Dimensions data. It pulls together your biographical information, linked publications, grants, professional activities, and teaching activities into a single, search-engine-discoverable profile.
Making Your Elements Profile Public
- Click EDIT MY PROFILE under your photo on the Elements user homepage.
- Select Public in the Profile privacy box. Your profile will appear on Wildcat Scholar after the next feed refresh.
Wildcat Scholar Privacy Settings
Elements has three privacy levels: public, internal, and private. They apply to your profile and the fields within it.
- Public: Visible to anyone, including on Wildcat Scholar.
- Internal: Visible to any other logged-in Elements user at K-State.
- Private: Only visible to you and Elements users with privileged access (delegates or research administrators). Private profile fields don’t appear in view mode — they’re only visible in edit mode.
If you set a field’s privacy level to match your overall profile, that field’s privacy will follow the profile if the overall level changes.
New for the K-State launch: Wildcat Scholar uses the latest features of the Symplectic Elements Discovery module (v6.22, released December 2025). Your public profile can now display publication abstracts and AI-generated publication summaries — designed to help students, peers, journalists, and the public understand your research at a glance.
Publication Abstracts
On your Wildcat Scholar profile, each publication can show its full abstract — making it easier for visitors to assess relevance without leaving the page. Abstract display is automatically enabled by Digital Science for all institutions on the Discovery module; no configuration is needed on your end.
Where the abstract comes from depends on the source (Crossref, Scopus, PubMed, etc.). If a publication’s abstract is missing or incorrect, edit the manual record in Elements (see Manual Entry) or contact wildcatscholar@k-state.edu for help.
AI-Generated Summaries, Highlights, and Keywords
In addition to the abstract, Wildcat Scholar can display an AI-generated:
- Plain-language summary — a short, accessible explanation of the publication for non-specialists.
- Key highlights — the most important findings or contributions, in bullet form.
- Top keywords — to support discoverability and search.
These summaries are generated on demand using a private, secure AI environment and are intended to supplement, not replace, the official abstract. They make it easier for visitors who aren’t experts in your field to understand the relevance of your work.
Opting Out of AI Summaries
AI summary generation is enabled at the institutional level by K-State Libraries. Individual faculty can opt out at any time — either for a single publication or for your entire profile.
- Click EDIT MY PROFILE on your Elements homepage.
- Locate the AI summary preferences panel (under Privacy & display settings).
- Choose one of:
- On (default) — AI summaries are generated and displayed on your Wildcat Scholar profile.
- On, but require my approval before display — summaries are generated but only show publicly after you review and approve each one.
- Off — no AI summaries are generated or displayed for your work.
- Click SAVE CHANGES.
Note: If you change your mind, you can re-enable AI summaries at any time. Per-publication overrides are also available on each record’s privacy settings page.
Reviewing and Editing an AI Summary
- Open the publication record in Elements.
- Click the Discovery display tab to see what visitors will see on Wildcat Scholar.
- Click Regenerate summary if the AI text needs a refresh, or Override to write your own plain-language summary.
- Click SAVE to publish your changes.
To increase the impact of your published research, you can forward your publications directly from Elements to K-REx — the Kansas State University Research Exchange, K-State’s institutional repository. Elements will first check the Sherpa/RoMEO author-rights database to determine whether you can legally share your work, which version you can deposit, and any embargo or license requirements.
Note: Content you upload directly to K-REx will also appear in your publications list in Elements.
What You Need to Know About Sharing Your Work
Copyright and Your Rights as an Author
When your work is formally published — a journal article, book chapter, or conference paper — you may have signed a copyright transfer agreement with the publisher. This agreement often controls:
- Whether you can make your work openly available
- Where you can share it (for example, an institutional repository like K-REx)
- When you can share it (sometimes after a delay)
- Which version you’re allowed to share
Because of these legal requirements, we ask that you upload the version that’s closest to the final published PDF, as long as your publisher allows it.
Understanding the Different Versions of a Publication
Publishers often allow sharing, but only of specific versions of your manuscript. In Elements, you’ll see three possible versions you can deposit in K-REx:
- The Submitted Version (“Pre-print”)
- The version you originally submitted to the publisher.
- Has not been peer-reviewed.
- No publisher formatting or branding.
- May differ significantly from the final published version.
- The Accepted Version (AAM or “Post-print”)
- The version that has completed peer review.
- All reviewer-requested changes have been made.
- The final version you sent the publisher before they applied layout, copyediting, and branding.
- Textually the same as the published article but lacks the publisher’s typesetting.
- The Published Version (“Version of Record”)
- The final PDF on the publisher’s website.
- Includes the publisher’s formatting, layout, and branding.
- You may or may not be allowed to share this version, depending on your publisher agreement.
Understanding Embargoes
Even if a publisher allows you to make a version of your work open access, they may require an embargo — a period during which your work cannot be openly available.
Embargoes begin on the publication date. They vary widely — from 6 to 72 months — depending on the publisher. During deposit, Elements lets you specify the required embargo period. The K-REx repository team will review your deposit and make sure embargo requirements are correctly applied.
Checking Whether Your Work Is Already in K-REx
Before depositing, check your existing records:
- In Elements, open your Scholarly & Creative Works list.
- Select a publication and look for the Repository box to see if it’s already deposited.
How to Deposit a Publication in K-REx
In Elements, click the DEPOSIT button next to your publication.
You’ll be taken to the Deposit Publication page. There you can:
- Upload the file you’re allowed to share
- Select an embargo period (if needed)
- Complete the deposit
After you submit, the K-REx repository team will review your deposit and apply any embargoes or licensing requirements stated by your publisher.
Activity types and general functionality
Scholarly and creative works*
- Artifact
- Book
- Chapter
- Composition
- Conference
- Dataset
- Design
- Exhibition
- Figure
- Fileset
- Internet publication
- Journal article
- Media
- Patent
- Performance
- Presentation
- Poster
- Report
- Scholarly edition
- Software / Code
- Thesis / Dissertation
- Preprint
- Other
*Several types of publications are brought in automatically from online databases for faculty and staff to claim.
Grants
- Commercialization
- Consulting
- Contract research
- Cooperative agreement
- Fellowship
- Grant
- Philanthropic funding
- Project
- Purchase Order
- Seed funding
- Service agreement
- Subaward agreement
- Travel
- Other
*K-State’s Office of Sponsored Programs has connected Cayuse to automatically load grants from 2019 to present. If you need additional information from K-State for pre-2019, please reach out to the Office of Sponsored Programs. However, if you have grants from previous institutions or not processed through Sponsored Programs, you will need to manually add those grants.
Service and engagement
- Award / Honor
- Consulting
- Editorship
- Media distribution (non-publication)
- Mentoring (non-student)
- Professional development
- Proficiency / Skill
- Project Management
- Review / Refereeing
- Service - Community
- Service - Department / Unit / University
- Service - Discipline / National
- Sponsor (student organization)
- Testimony
- Other (Engagement Activity)
- Other (Professional Activity)
Teaching activities
- Course developed
- Course taught
- Graduate student advising
- Program developed
- Student academic advising
- Other student mentoring
Records of impact
Quick look-up for most common activities
Activities that support students and instruction
Advised undergraduate student on course and degree
Section: Teaching activities
Type: Student academic advising
Serve as a major professor
Section: Teaching activities
Type: Graduate academic advising
Serve as a faculty/staff advisor for a student organization
Section: Service and engagement
Type: Sponsor (student organization)
Peer reviewed a curriculum
Section: Service and engagement
Type: Review / Refereeing
Activities that support research and scholarship
Attended a research conference
Section: Service and engagement
Type: Professional development
Lead an applied research project
Section: Service and engagement
Type: Project management
Peer reviewed conference presentations
Section: Service and engagement
Type: Review / Refereeing
Peer reviewed a journal article
Section: Service and engagement
Type: Review / Refereeing
Journal articles
Section: Scholarly and creative works
Type: Journal article
Edited an article
Section: Service and engagement
Type: Editorship
Developed manuals
Section: Scholarly and creative works
Type: Report
Supervise a research assistant
Section:
Type:
Peer reviewed a curriculum
Section: Service and engagement
Type: Review / Refereeing
Presented a poster at a conference
Section: Scholarly and creative works
Type: Poster
Presented at conference with published proceedings
Section: Scholarly and creative works
Type: Conference
Presented at conference without published proceedings
Section: Scholarly and creative works
Type: Presentation
Consulted with a research grant
Section: Grants
Type: Consulting
Consulted without a research grant
Section: Service and engagement
Type: Consulting
Developed a new patent
Section: Scholarly and creative works
Type: Patent
Received seeding funding for a new research project
Section: Grants
Type: Seed funding
Activities that support public service and public awareness
Event judging
Section:
Type:
Exhibitor at an expo
Section:
Type:
TV/radio/podcast interview
Section: Service and engagement
Type: Media distribution (non-publication)
Extension presentation
Section: Service and engagement
Type: Professional development
Hosted a public exhibition
Section: Scholarly and creative works
Type: Exhibition
Ran a 4-H club meeting
Section: Service and engagement
Type: Sponsor
Interviewed for print publication
Section: Service and engagement
Type: Media distribution (non-publication)
Provided expertise or advice
Section: Service and engagement
Type: Consulting
Created a PowerPoint
Section: Scholarly and creative works
Type: Presentation
YouTube Video
Section: Service and engagement
Type: Media distribution (non-publication)
Wrote a magazine article
Section: Scholarly and creative works
Type:
Wrote a newsletter
Section: Scholarly and creative works
Type:
Developed a workshop
Section: Service and engagement
Type: Professional development
Extension numbered bulletin
Section: Scholarly and creative works
Type: Report
Designed an instructional film
Section: Scholarly and creative works
Type: Media
Activities that provide service to the institution, discipline, and colleagues
Formal or informal mentor to a faculty member or staff
Section: Service and engagement
Type: Mentoring (non-students)
Chaired a university/department/unit committee
Section: Service and engagement
Type: Service – Department / Unit / University
President of a discipline or national organization
Section: Service and engagement
Type: Service – Discipline / National
Served as a board member for a community-based organization
Section: Service and engagement
Type: Service – Community
Presented in an in-service training
Section: Service and engagement
Type: Professional development
Activities related to my professional development
Attended a seminar/conference
Section: Service and engagement
Type: Professional development
Attended an expo
Section: Service and engagement
Type: Professional development
Member of professional association
Section: Service and engagement
Type: Service – Discipline / National
Awarded distinguished title
Section: Service and engagement
Type: Award / Honor
Developed new proficiency and/or skill
Section: Service and engagement
Type: Proficiency / Skill