Customizable workspace
Panel Management/Layout
Panels are grouped in categories. They can be collapsed (minimized), expanded
(maximized), and resized. You can also customize how the panels are grouped.
In Dreamweaver 4.0, the panels are floating, whereas with Dreamweaver MX, you
have the choice of undocked panels (floating around the desktop) or docked (secured
to a specific spot).
Panel Overview
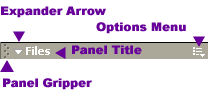
Collapse/expand panels
- Collapse/expand all panels at once by clicking on

- Select the panel group title or expander arrow to collapse or expand a
panel.
Resizing panels
- To resize a panel vertically, select the top or bottom border of the panel
you want to resize and drag to the desired location. You must have more than
one panel open or order to resize it vertically.
- To resize all panels horizontally, select the border between the document
window and the panels and drag to the desired location.
Undocking
Individual panels may be undocked by clicking on
the Panel Gripper (see above illustration) and dragging
the panel out of the panel area.
Move and dock panels
Panels may be moved to a new location and docked
by clicking on the Panel Gripper and dragging it to
the left or right of the document window.
Group tabs within panels
Tabs can be grouped with other panels or you may create your own panel.
- Right-click on the tab that you want to group
- Select Group <panel name> with and choose
the panel you want to group it with or select New Panel Group and create your
own panel.
Toolbars
- Standard - buttons such as new, save, copy, etc. This toolbar may be customized
using XML or Javascript.
- Document - buttons for various viewing options, previewing in browser, etc.
Preferences
Preferences enable you to customize Dreamweaver to meet your individual needs
whether you are a beginning web author or a webmaster. In addition, you may
select options for defining how Dreamweaver operates as well as specific options
that you want to be available to you. The following are some highlights that
you should be aware of:
- General
- Update links when moving files - this option
informs Dreamweaver what you want done when you move, delete or rename
a file. It is beneficial to have Dreamweaver update your links so you
don't have to go to each file that referred to a specific link and change
it manually.
- Change workspace - choose which interface
layout you want (integrated workspace with panels on the right, integrated
workspace with panels on the left or Dreamweaver 4-floating).
- Use <strong> and <em> in place of <b>
and <i> - this options places <strong> and <em>
tags when the bold and underline buttons are used. However, these codes
should be used in the proper context. They shouldn't be used to simply
achieve bold or italics. If you want bold or italics in your web page,
define them in a style sheet.
- Accessibility - you may enable several features
related to accessibility such as being prompted for additional information
when inserting tables, images, forms, etc.
- Code Coloring - enables you to select specific
colors for specific codes which assists you when trying to locate specific
types of code.
- Code formatting - allows you to design how you
want code to be formatted (indention, case, etc.)
- Code hints - this option enables Dreamweaver to
assist you in typing your code by utilizing the auto-completion feature.
- Code rewriting - enables you to to determine what
dreamweaver does to your code when you open a file. The following are some
of the options:
- Fix invalidly nested and unclosed tags
- Rename form items when pasting (so you won't have duplicate names)
- Remove extra closing tags
- Panels - lets you determine which panels you want
displayed on top of the document window and how you want them displayed
- Preview in Browser - enables you to configure
browsers for testing your web page
- Site Panel
- Always show - determine which site is shown (local or remote) and in
which panel
- Dependent files - choose if you want to be prompted before transferring
dependent files. For example, if the index.html file is transferred and
there are 2 graphics on that page, you can determine whether you want
Dreamweaver to transfer those files automatically or to prompt you or
even to never transfer the files.
- FTP Connection - set the amount of time for your ftp connection to time
out
Extensions
Dreamweaver exchange has over 700 extensions that can be downloaded from Macromedia
and installed. Therefore, if you need Dreamweaver to do something that it doesn't
already do, checkout the free extensions at www.macromedia.com.
Although it isn't free, LIFT is an example of an extension.
Site Definition
Setup wizard
Dreamweaver MX has a wizard to help you through the site definition process.
The following are the steps:
- Name Your Site.
- Select if you work with Server Technology (if you don't know what this means,
you probably don't).
- Select how you work with files during development (do you save them locally
and then upload or save directly to a server).
- Select how you connect to the web server (ftp, network, etc.).
- Select if you want to enable check-in/check-out (if it is a large site with
many web authors, you may want to have users checkout items).
Navigating between sites
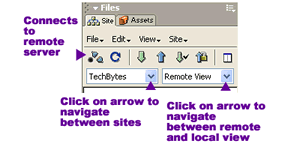
Uploading/downloading
(You need to have ftp information configured during site setup).
- To download, connect to remote site and select file(s) you wish to work
on.
- To upload, save the file locally. Then select Site>Put to ftp the file
to the server.
Creating pages
Insert Bar - replaces what was previously the objects
panel in Dreamweaver 4.0.

- The insert bar contains tabs for different categories of objects. Within
each category is a toolbar of various objects which can be inserted into your
page such as images, tables, horizontal rules, etc. The insert bar can be
docked or undocked just like the panels.
- You will notice that the insert bar and the properties bar have some similar
components. The properties bar informs you of what you actually have selected
whereas the Insert bar lists objects that can be inserted. The insert bar
doesn't give you any visual clues about what you have done within the page.
For example, if you have inserted a bulleted list, the property inspector
will show an indented bulleted list. However, in the insert bar, there will
be no indication that anything has been inserted.
Layout
Accessibility - by selecting options in preferences,
Dreamweaver assists you in making sites accessible as you work. Dreamweaver
is also fully keyboard-navigable. Keyboard shortcuts can be defined by selecting
Edit>Keyboard Shortcuts.
Tabbed Document Windows - if you are working with
multiple pages, Dreamweaver tabs the file name of each window which makes it
easier to navigate between files.

CSS panel - Redesigned to include an edit styles
button. Select the edit styles button to find out descriptive information about
defined styles. In addition, double-clicking on any style will open the style
for editing.
Spell Checker - A spell checker is always a must
(Text>Check Spelling)
Code
Navigation Bar
Navigation bars are one or more buttons (elements) used to move between files
and pages.

A navigation bar with five elements.
Before inserting a navigation bar it is necessary to create a set of images
(states) for each navigation element. There are four states a navigation bar can
have: up, down, over, and over while down.
- Four States of Navigation Bar Elements
| Up |
How the element looks before
it has been clicked. |
 |
| Down |
How the element looks after it has
been clicked. |
 |
| Over |
How the element looks when
the pointer rolls over it. |
| Over While Down |
How the element looks when
the pointer is rolled over it in it's down state. |
The simplest navigation bars only have an up state. Using more than one state
per element gives the user a visual clue that they can interact with it. Using
four states does not necessarily mean using four images. While some navigation
bars may have a different image for each state, many use one image for the
up state and one image for the over, down, and over while down states.
- Create Navigation Bar
To open the Insert Navigation Bar dialog box:
- From the menu bar choose Insert>Interactive Images>Navigation
Bar
OR
- Click the Navigation Bar button
 from the Common tab of the Insert bar.
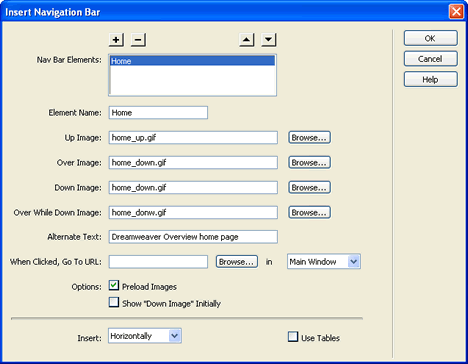
In the Insert Navigation Bar dialog box:
- Type a name for the element in the Element Name field.
- Use the browse buttons next to the Up, Over, Down, and Over While Down
Image fields to select the images for each state of your button. The Up
field is required, the others are optional.
- Enter a description of the button in the Alternate Text field.
- Use Browse to select a file to open when the element is clicked, or
type a complete URL in the When Clicked, Go To URL field.
Note: The first four steps are repeated for each
element of the navigation bar.
- Check Preloaded Images to avoid delays when user moves pointer over
element.
- Check Show "Down Image" Initially to have the down image
display first.
- Choose whether the navigation bar will be horizontal or vertical on
the page from the Insert drop-down list.
- Check the Use Tables box to insert the navigation bar as a table.
- Click the Add Item and Remove Item buttons

 to add additional or remove navigation bar elements.
- Use

 to move items up or down in the list of navigation bar elements.
Additional Resources
- Answers panel - a panel within Dreamweaver that
connects to Macromedia's Online Support Center
- Macromedia's
New Web Designer Tools - http://www.macromedia.com/software/dreamweaver/product_resources/evaluation/new_designers.html
- Macromedia's Designer and Developer Center - http://www.macromedia.com/desdev/
- Macromedia's DreamWeaver Forum - http://webforums.macromedia.com/dreamweaver/
- Dreamweaver Extensions - http://www.macromedia.com/exchange/
- Macromedia Tip of the Week - http://www.macromedia.com/desdev/tip/
- MX Insite Magazine - http://www.mxinsite.com/main.aspx
- Tutorials - http://www.projectseven.com/index.htm,
http://www.lynda.com




![]()
